Deploy an ecosystem of Climate Services Information Systems
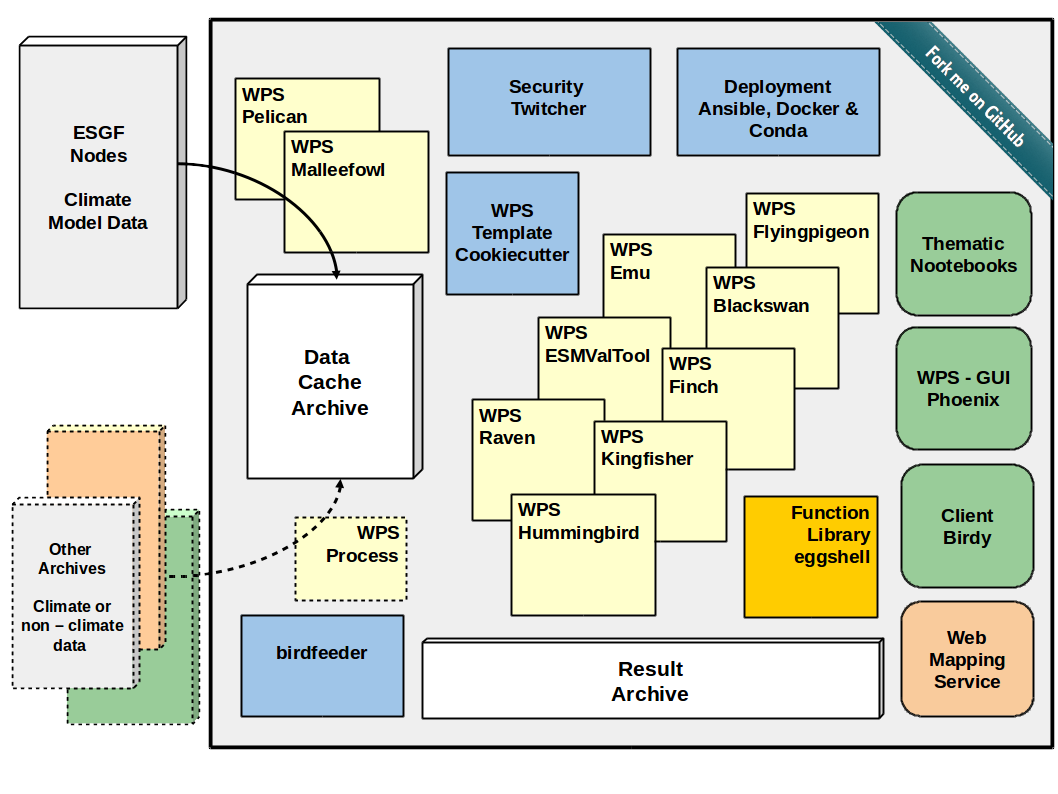
The birdhouse framework is modular organized to enable a flexible architecture design depending on the projects needs. To enable FAIR Climate Services the applications are cpmoient to international approved standards, mainly following OGC Standards. Therefore software components developed outside of the birdhouse framework can be combined in the architectures enshuring interoperability.
Delopy a single service: Inpaint missing values
The following is a demo web-application developed within the the Climate Intellignce CLINT project providing a process to inpaint missing values in datasets with AI-enhanced Climate Science. It is based on the Phoenix web-application from the Birdhouse collection and makes use of the PyWPS Python package, which is an implementation of the Web Processing Service standard from the Open Geospatial Consortium. The implemented scientific methode is available as application Climate Reconstraction AI CRAI, a state-of-the-art deep learning based inpainting technology to infill missing values in climate datasets1.
The current demo gives the possibility to infill near-surface air temperature anomalies in the HadCRUT4 and HadCRUT5 datasets. The input and output netCDF files are handled through an intuitive user interface.
Install duck with conda
We need mamba to install the requirements. Use your existing mamba or install it from here: https://github.com/conda-forge/miniforge
Get the source:
git clone https://github.com/climateintelligence/duck.git
cd duck
Create the conda environment for duck:
mamba env create
Activate the duck environment:
conda activate duck
Install duck in this environment:
pip install -e .
Start your duck as a web service:
duck start -d
See it is responding by sending a WPS GetCapabilities request:
http://localhost:5000?service=WPS&request=GetCapabilities
You can stop the service with:
duck stop
Deploy an entire Climate Services Information System
If you are already familiar with installing single standalone service, then you are ready to set up an entire ecosystem of services and adding an online graphical user interphases to offer a portal for the user.
Extended explanation of deployment options including entire scripts are available in the birdhouse-deploy repository
Prepare Installation
It is recommended to collect the repositories in a separate folder (e.g. birdhouse, but can have a name of your choice):
$ mkdir birdhouse
$ cd birdhouse
Get the source code from GitHub
$ git clone https://github.com/bird-house/pyramid-phoenix.git
$ git clone https://github.com/bird-house/finch.git
$ git clone https://github.com/bird-house/malleefowl.git
Run Installation
As described above for the inpainting missing value, you can run the installation with default settings. It will create a conda environment and deploy all required software dependencies there. Read the changing the default configuration if you want to customize the configuration. In all of the tree folders (finch, duck and pyramid-phoenix) run:
$ make install
This installation will take some minutes to fetch all dependencies and install them into separate conda environments.
Start the Services
in all of the birds run:
$ make start
Launching the Phoenix Web App
If the services are running, you can launch the GUI in a common web browser. By default, phoenix is set to port 8081:
open http://localhost:8081
or:
open https://localhost:8443/
Now you can log in (upper right corner) with your Phoenix password created previously. Phoenix is just a graphical interface with no more function than looking nice ;-).
Register a service in Phoenix Web GUI
Please read the Phoenix documentation
Your first administration step is to register finch as a service. For that, log in with your phoenix password. In the upper right corner is a tool symbol to open the settings. Click on Services and the Register a Service.
Finch is per default on port 5000.
The appropriate url is:
http://localhost:5000/wps
Provide service title and name as you like: Service Title: Finch Service Name: finch. Check Service Type: Web Processing Service (default) and register. Optionally, you can check Public access?, to allow unregistered users to launch jobs. (NOT recommended)
Launching a Job
Now your birdhouse ecosysem is set up. The also installed malleefowl is already running in the background and will do a lot of work silently. There is no need to register malleefowl manually!
Launching a job can be performed as a process (Process menu) or with the wizard. To get familliar with the processes provided by each of the birds, read the approriate documentation for each of the services listed in the Application List
Changing the default configuration
You can customize the configuration of the service. Please read the documentation, for example:
Furthermore, you might change the hostname (to make your service accessible from outside), ESGF-node connection, the port or the log-level for more/less information in the administrator logfiles. Here is an example pyramid-phoenix/custom.cfg:
[settings]
hostname = localhost
http-port = 8081
https-port = 8443
log-level = DEBUG
# run 'make passwd' and to generate password hash
phoenix-password = sha256:513....
# generate secret
# python -c "import os; print(''.join('%02x' % ord(x) for x in os.urandom(16)))"
phoenix-secret = d5e8417....30
esgf-search-url = https://esgf-data.dkrz.de/esg-search
wps-url = http://localhost:8091/wps
Update Phoenix Password
To be able to log into the Phoenix GUI once the services are running, it is necessary to generate a password: go into the pyramid-phoenix folder and run:
$ make passwd
This will automatically write a password hash into pyramid-phoenix/custom.cfg
Backups
See the mongodb documentation on how to backup the database. With the following command you can make a dump of the users collection of the Phoenix database:
$ mongodump --port 27027 --db phoenix_db --collection users